Barbecued Lamb Kebabs, Fattoush and Failed Muhammara
I wasn’t feeling very well yesterday and consequently didn’t plan anything for dinner today. As soon as I saw the weather forecast, I knew we had to barbecue but I was stumped as to what I could cook that wouldn’t need marinating (I did consider taking everything I needed to work with me and whipping up a marinade in my lunch break but chickened out).
I eventually settled on lamb kebabs made with minced lamb, figuring I could get plenty of flavour into the meat without the need for a long marinating time. I was foiled when I got to the supermarket at lunchtime though since they didn’t have any lamb mince. I didn’t have a plan b and, since I’d already planned the accompaniments, I picked up some reduced lamb leg pieces instead.
As it turned out, I got home a little earlier than I was expecting so that, coupled with a later-than-usual dinner, meant the lamb got at least an hour to marinate before the coals were ready.
I did some random internet searching for these recipes and now can’t find the link for the fattoush so I’ll reproduce it here. The cut and paste job I did on the muhammara tells me it’s originally from “Cooking the Middle Eastern Way” by Christine Osborne. This turned out to be a complete failure sadly, I’m not sure what I did wrong but the texture was that of uncooked stuffing. The flavour was brilliant though and worked very well with the heat of the sumac that was present in everything else – I need to research this a little more and perhaps try another recipe.
The lamb worked out well, even with the relatively short marinating time. Stephen cooked it expertly meaning there was a decent char on the outside but the insides were still tender and pink. There was just enough spice coming through from the sumac but it did still have that slight gritty texture that we’ve complained about before – perhaps I need to pound it in the mortar and pestle before using (although now I look back I see that I said exactly that last time).
The fattoush was more successful than last time too, the flavours were more subtle and had a better balance between hot and sour. It complimented the lamb well, since a lot of the flavours were present in both dishes but the thing that brought it all together was the flavour of the muhammara, even though the texture was off-putting.
Lamb Kebabs
Serves Two
1 packet of diced lamb leg (I can’t remember what it weighed)
Tablespoon sumac
1 garlic clove, crushed
Juice of half a lemon
Tablespoon olive oil
Pepper
Salt
Start by soaking the skewers in cold water.
Combine all ingredients together (apart from the salt) and coat the lamb with the mixture. Leave in the fridge for as long as you can and then, just before cooking, add the salt, mix and thread the meat onto the skewers.
Barbecue over direct heat for 15 minutes, or until cooked to slightly pink.
Fattoush
Serves Two
1 pita bread
Lettuce
1 spring onion, finely sliced
3 tomatoes, chopped
Handful chopped parsley
Handful chopped mint
1 garlic clove, peeled*
1 tablespoon sumac
1/8 cup olive oil
1/8 cup lemon juice
Salt
Pepper
Chop the salad ingredients and combine.
Toast the pita bread, cool and then tear into pieces. Add to the salad.
Take all other ingredients, shake up in a jar and pour over the salad.
* The original recipe calls for a clove of crushed garlic. I love garlic but I don’t like a lot of raw garlic, particularly not when I have to go to work the next day. I crushed the clove, added it to the jar and then removed it before serving.


Greek Salad, Pseudo-Rustic Style
When I’m a bit hung over, I sometimes crave salad. I know this is rather unusual since most people crave hamburgers or sausages or something along those lines, but I have a theory as to why it happens – tomatoes and cucumber contain a lot of water, which is what the body needs when you are hung over. And if the salad contains something salty such as Feta and/or olives, then all the better.
As it turned out, I was not actually hung over this morning, but I did spend a lot of time running around in the sun yesterday, chasing a little red ball all over a rather large field without much success, so was a bit dehydrated today. And I woke up thinking about Feta, which I haven’t really thought about for a while and can only have been caused by one thing – watching the final episode of Jamie Oliver’s “Jamie Does…” series last week, which was in Greece.
There seems to have been something of a pattern to these programmes – in each country that he visits, he will make a “main” dish, a fish dish or starter, a soup and a salad. At least that is the way that it has seemed in those that I have watched. In Greece of course, the salad had to be Greek salad.
We didn’t have all of the ingredients, so the salad that I made wasn’t quite the same as his, but it was close. My ingredients were:
Three different types of tomatoes, sliced “rusticly”. I remember on the programme he said something like “you really want it to look home made”. Of course it will look home made; I’m making it at home. Grr. Anyway.
Red onion, sliced very thinly.
Cucumber, scraped decoratively with a fork and then sliced.
Olives, preferably decent ones – mine were quite boring and plasticky as I couldn’t find decent ones this morning.
Fresh mint, oregano and parsley. Jamie used mint and dill, but we didn’t have dill.
Dried oregano
Dressing – lemon juice, good olive oil, salt and pepper.
A slice of Feta, kept whole
(Jamie also added sliced green pepper, which we didn’t have)
Mix all of the vegetables and fresh herbs together, dress with the dressing and toss, with your fingers of course. Then put the piece of Feta on top, sprinkle with the dried oregano and drizzle with some more olive oil.
This was delicious, just what I was after and perfect for eating in the garden on a beautifully sunny day like today. I had actually forgotten that we had dried oregano and hadn’t added it, but Kerri reminded me and I was glad that she did because it added a lovely fragrance to the salad. I thought it would be a bit unwieldy to have the Feta in one large piece, but you can of course break bits off with your fork as you go if it’s a one-person salad. If it is for more people then it probably would be unwieldy.
I shall certainly try variations on this theme in the future – I particularly like the idea of using more than one variety of tomato in a salad. I love tomatoes and usually buy different varieties from one week to the next, but I don’t remember every purposefully making a salad with more than one variety before. Hopefully the summer will last, to give me reasons to make it!


Pan Bagnat
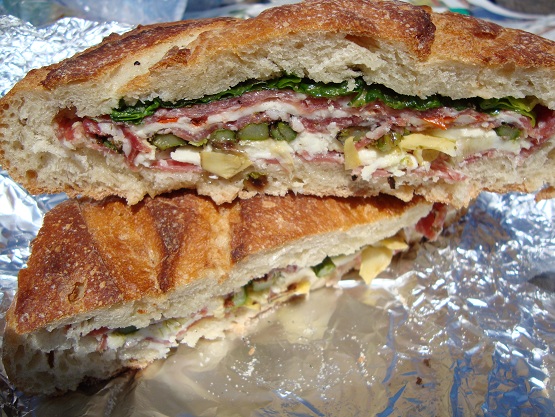
After the success of the recent shooter’s sandwich, Stephen and I began to think of other ways to pimp the humble sandwich. This has been on my list of things to “cook” for a long time and seemed the obvious choice. What wasn’t so obvious was just how I was going to get through the whole thing on my own since Stephen is still experimenting with a wheat-free diet. The first cricket game of the season was the perfect opportunity since I knew there would be plenty of volunteers to help me out.
I bought the bread and fillings on Friday and intended to make it that afternoon and leave it in the fridge overnight but, worrying about the sog-factor, I assembled it quickly on Saturday morning instead. This meant the bread wasn’t quite as fresh as it could have been and I should have removed more of the dough from the inside but otherwise it was a huge success.
The original pan bagnat uses a salad nicoise filling but I opted for something more Mediterranean, stuffing as much as I could into the hollowed out sourdough loaf. It’s difficult to give exact quantities because that will depend so much on the size of your loaf and how much of the inside you remove. To give you a rough idea, there were almost two balls of mozarella in here and a packet and a half of salami.
So, start by slicing off the top of your loaf and removing the insides. Drizzle the loaf with olive oil, rub a garlic clove all over the exposed dough and season with salt and pepper. Then start adding your fillings. I started with a layer of salami and finished with some lettuce so the bread didn’t get too soggy but how you do it is really up to you. Aside from the salami and lettuce, I also added the mozarella, some leftover barbecued asparagus and spring onions, some Peppadew peppers, some marinated artichokes and a few olives. Season the layers as you go, put the lid back on, wrap in foil and squash the whole thing together.
Since we had to leave early, I wedged this at the bottom of our coolbag and put everything else on top. We ate it about four hours later which seemed about the right amount of time for the flavours to mingle and combine. Sunshine, a brilliant sandwich and a glass of Pimm’s in Greenwich park was a pretty good way to toast the start of the summer.


Mexican Barbecued Ribs
I bought these pork ribs earlier in the week with a vague idea of what I was going to do with them but, having seen the weather report, Stephen suggested keeping them until tonight and barbecuing them. We don’t eat ribs often so I wasn’t really sure what to do with them, a quick flick through Rick Bayless’ “Mexican Kitchen” was all that was required and I found an easy marinade.
Part of the reason I liked this marinade so much was that half was used to marinate the ribs overnight and the other half reserved (with some honey added) for the cooking. A lot of recipes (including the one we used previously) seem to require both a dry rub and a wet marinade and while I’m sure this is worthwhile, the faff value is off-putting if you don’t have plenty of time to spare.
Despite a recent trip to Borough market to stock up on Mexican ingredients, we didn’t actually have any of the chillies required for this recipe (ancho and guajillo). I improvised and used what we did have: habanero and chile de arbol. These worked well and added both heat and depth, I’m not sure how the dish would have turned out had we had the chillies specified but we were both happy with what we had. Ordinary chillies would result in a different taste but still worthwhile if you don’t have access to the dried ones.
I can’t remember what type of ribs we used but there wasn’t a huge amount of meat on them, one of the reasons I can’t really be bothered with them. What meat was there was tasty but if we cook them on the barbecue again then I’ll do my research first and try to find some meatier ribs. The marinade was really good though and versatile too, I can imagine it working with any kind of barbecued meat. It keeps in the fridge for a couple of weeks too so worth making a large batch in advance if you’re planning a lot of barbecues this summer.
We also had some corn salsa, using this recipe from a couple of weeks ago. I boiled the corn this time with a fair amount of salt and it really seemed to enhance the sweetness of the kernels. I added chilli this time too which we would normally do, I didn’t last time because there was so much chilli in everything else.
Mexican Rib Marinade
Serves Two (enough for six ribs with a little left over)
2 garlic cloves, unpeeled
4 dried chillies
1/2 teaspoon oregano
1/4 teaspoon cinnamon
1/4 teaspoon black pepper
Pinch of cloves
Pinch of cumin
1 tablespoon cider vinegar
1/4 cup beef stock
3/4 teaspoon salt
1/2 teaspoon sugar
3/4 tablespoon honey
Toast the garlic in a pan until it starts to blacken, remove and set aside to cool. Peel.
Toast the dried chillies for a few seconds each side. Remove from the frying pan and soak in hot water for 30 minutes. Drain and discard the water.
Blend all the ingredients together except from the honey.
Taking half of the marinade, coat the ribs and chill in the fridge overnight. Add the honey to the other half of the marinade and store in the fridge.
As I mentioned above, we don’t really cook ribs often and since all the recipes I found stated they should be cooked in the oven first, that’s what we did. In hindsight, I don’t think this was necessary and in future, I would put the whole lot on the barbecue and brush on the honey-marinade. As it was, we cooked our ribs first, for 20 minutes, at 180 degrees and then finished them on the barbecue for 15 minutes.


Anchovy and Asparagus Pasta
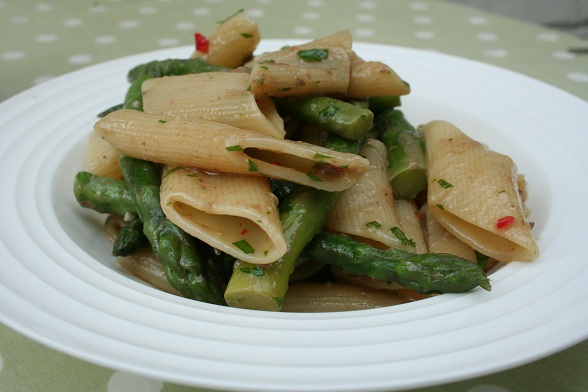
This was mostly the same as the spaghetti and anchovies I ate on Tuesday, just with the addition of asparagus. I’ve got a big bag full of asparagus stalks in the fridge that I’ve been wondering what to do with, a couple of years ago I made asparagus pesto which I remember as being really good but tonight, I needed to use up the leftover anchovies.
I decided to make a kind of stock with the asparagus ends, to use as an emulsifier for the anchovy, chilli and garlic. All I did was boil the ends in some water for about 15 minutes and then added this to the aforementioned ingredients. It worked well and there was definitely a huge amount of flavour in the water. It occurred to me that I could actually blend the stalks into the water to release more flavour but I was worried about the soupiness of the texture, I haven’t disregarded this idea completely though and may do that next time.
I really liked this, it was more interesting than the previous attempt and the textures of the pasta and asparagus worked well together. I quite like the idea of adding crab or prawns too but think the chilli and anchovy would probably over-power the delicate flavours. Perhaps reducing the anchovy or omitting it would work though.
I have another couple of things I want to do with asparagus so need to work quickly before the season is over. I’ve found half-price asparagus in both Sainsbury’s and Waitrose recently which has been another good excuse for eating so much of it, the Sainsbury’s bunches were Peruvian though sadly.
Anchovy and Asparagus Pasta
Serves Two
Pasta
Asparagus stalks
Asparagus tips
2 cloves garlic, chopped
1 red chilli, chopped
Large handful of parsley, chopped
Lemon juice
Black pepper
Start by cooking the pasta.
At the same time, boil the asparagus ends for about 15 minutes or until you’re left with about three tablespoons of water and then set aside. Steam the asparagus tips separately and set those aside too.
To make the sauce, fry the garlic, chilli and anchovy for about three minutes. Add the reserved water and cook until the liquid has reduced by half.
Combine the pasta and the sauce, add the parsley and the asparagus tips and toss together gently. Add a squeeze of lemon and some black pepper and serve.


Frijoles with Chorizo
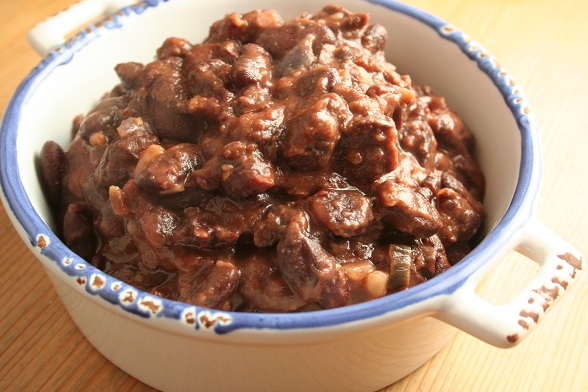
I had a plan for tonight’s dinner, an idea that’s been bubbling away in the back of my mind for a while waiting until I had some spare time to experiment in the kitchen. This wasn’t it. Stephen still isn’t feeling well and requested a plain, baked potato for dinner. I thought about going ahead with my plan anyway but decided to save it for when he’s feeling better and join him in the baked potato. I didn’t want mine plain though so made up a batch of beans to go with it and some to squirrel away in the freezer for use at a later date.
This isn’t really my recipe and is based on the Mexican bean dish we often cook from the strange little Mexican book neither of us know the origin of. There’s a lot of timer-setting and toing-and-froing to the kitchen with that recipe though so I simplified it today and found little, if any, difference to the original.
These beans are looser than I would normally cook them, I cooked them that way because I knew I’d be eating them with a potato. I would reduce the water if these were accompanying something wet or being used in wraps.
Mexican Beans
Serves six to eight (as a side dish)
350g beans
Water (it’s really hard to say how much, I added a couple of pints to begin with and kept topping the levels up as they cooked)
8 small chorizo sausages, sliced
2 onions, finely chopped
4 cloves garlic, crushed
2 red chillies, chopped
2 bay leaves
1 tbsp paprika
2 tsps oregano
4 tomatoes, chopped
Add the beans to a large pot and cover with plenty of water. Add half the onion and half the garlic, all the chilli and the bay leaves and bring to the boil. Boil hard for 10 minutes then reduce the heat to a simmer and cook the beans for 1.5 hours or until they are cooked (remember to keep an eye on the water level and top up the water if necessary, by the time they are cooked through you want there to be very little liquid remaining which can mean adding water a little at a time). Season with salt and then turn off the heat.
In a frying pan, fry the remaining onion and garlic in some oil until soft. Add the paprika and oregano and stir to incorporate. Add the chopped tomatoes and cook for another couple of minutes.
Take three tablespoons of the beans and add to the frying pan with the onions, garlic, etc. Mash the beans to a paste and then transfer the contents of the frying pan to the reserved beans. Stir, heat through if necessary and then serve.
If using chorizo, brown and remove from the frying pan before cooking the onions and then return to the beans with the contents of the frying pan.


Spaghetti with Anchovies
Due to a shopping mixup a couple of weeks ago, we are now overrun with pasta. Not a bad position to be in if you love pasta (which I do) but not so great if only one of you is eating it (Stephen is currently experimenting with a wheat-free diet). Stephen still wasn’t feeling very well tonight though so, since it was only me eating, it was the perfect opportunity to free up some cupboard space and start working my way through the pasta mountain.
I saw this recipe in Diana Henry’s “Crazy Water, Pickled Lemons” a couple of weeks ago and put it on the menu for that week but, as happens often, it got bumped in favour of something else. It’s not been too far from my thoughts though and was perfect for tonight since I didn’t have time to do any shopping on the way home and I knew I had all the ingredients for this already.
It was quick and easy, save for a mishap with the hob which resulted in the kitchen becoming covered in fishy oil leading to an intensive cleanup operation afterwards. Not quite part of the plan for a speedy dinner but not the fault of the recipe.
The end dish wasn’t really what I was expecting although it’s hard to remember now what I had in mind when I thought about the flavours. The characteristic strong, fishy flavour that anchovies are known for had cooked out even with the relatively short cooking time, possibly due to the pre-soaking in milk, and what was left was much more delicate but still identifiable as anchovy. The classic combination of garlic and chilli complimented the saltiness of the fish and created a deep, round flavour but there wasn’t much in the way of sauce and the breadcrumbs dried the whole thing out very quickly. I’d skip those next time, even though the crunch was pleasing to begin with.
Spaghetti with Anchovies
Serves Two (although I only made one portion, I’ve scaled it up here)
8 anchovies
Milk
1 garlic clove
1/2 chopped chilli
Handful chopped parsley
Fried breadcrumbs
Start by soaking the anchovies in a little milk for 15 minutes.
In a frying pan, gently heat some olive oil, add the garlic and leave it until it has browned. Remove and discard the garlic but retain the oil (although I think a little crushed garlic, left in the pan would be good).
Add the chilli and anchovies and cook until the chillies just start to brown. I added a little water at this point to loosen everything.
Add the chopped parsley, stir into the pasta and top with the fried breadcrumbs (or leave them out).


Leftover Roast Chicken
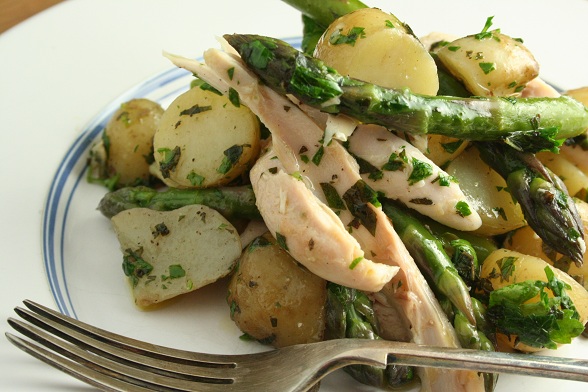
Knowing we would have leftovers from yesterday’s roast chicken, I planned this in advance, based on something we ate last year.
Stephen isn’t feeling very well this evening so, since it was just me eating, the temptation to eat something quick and easy was strong. Not wanting to waste the best part of half a chicken, I did the right thing and went ahead with my plan, making a few shortcuts along the way.
Instead of making up a “proper” salsa verde, I just chopped up some mint and parsley, threw that on top of the hot potatoes and asparagus and added some capers (which you can’t see in the picture but were definitely there) and olive oil. While most of the typical salsa verde flavours were there, the dish didn’t come together as well as it would have had all the seasonings been blended together. For the sake of an extra few minutes, it’s definitely worth getting the blender out and doing this properly. It was far from ruined though and much better than the alternative chicken sandwich would have been.
Some lettuce and spring onion would have been a good addition here, as would the pistachio nuts we used last year.


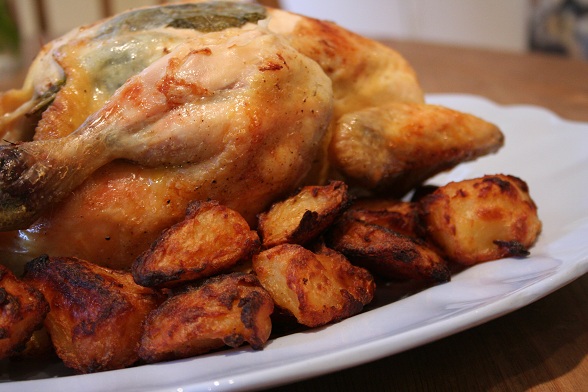
Roast Chicken
While staying with my mum, I remembered that last time I had visited, I froze a roast chicken. I can’t remember why, I suspect we just made other plans for lunch but, knowing it was there, I decided I would roast it on Friday night. I defrosted it slowly overnight but, when it came to cooking it, it smelt bad and I had to throw it out. Luckily, my mum’s freezer is ridiculously over-sized and I managed to unearth enough sausages to feed the proverbial army so I cooked those instead.
The roast chicken craving was firmly in place though so as soon as Stephen and I got back to London, he went off in search of a good-smelling chicken for Sunday lunch.
There wasn’t anything particularly special about the chicken, we didn’t season it with anything particularly exciting or employ any wildly different cooking techniques but, having waited two whole days, it was exactly what I wanted and therefore perfect.
PS From Stephen: Strangely enough, we put some sage leaves under the skin as we have loads of sage growing in the garden and then Kerri realised that about this time last year we had done exactly the same thing!


East Quay – Whitstable
A bit of a backlog of posts, since I’ve been staying in Kent with my mum. Stephen came down for the weekend and, since it wasn’t raining, we drove down to Whitstable for the day.
We decided to have lunch at a place Stephen and I first ate at years, ago: East Quay, which is slightly further away from the centre of town but no less quiet. Despite it not yet being anywhere near peak season, the large dining area was almost full by the time we had finished our early lunch and headed off to check out the cheese shop.
As it wasn’t that long since we had finished breakfast, we shared a small plate of fruit de mer before our fish and chips. The small selection was all very good but the local oysters were, as ever, the star of the show. We saw them being delivered and unpacked into the open-plan kitchen area as we arrived and the freshness was obvious. The rest of the plate was all very good but I think we all would have been happy with a big dish of oysters.
Mum and I went for the cod and chips while Stephen opted for the fish of the day which was whiting. It was very good but incredibly bony and it took him a fair amount longer to finish than it did Mum and I. I was slightly disappointed with the choice of fries instead of proper chips but these were pretty good, the lack of bread and butter was a complete oversight on my part and despite not being able to finish my large plate, I would still have liked those extra carbs. You can’t have fish and chips with bread and butter can you?


